7 Pro Tips for Creating and Styling Magazine-Worthy Open Shelves
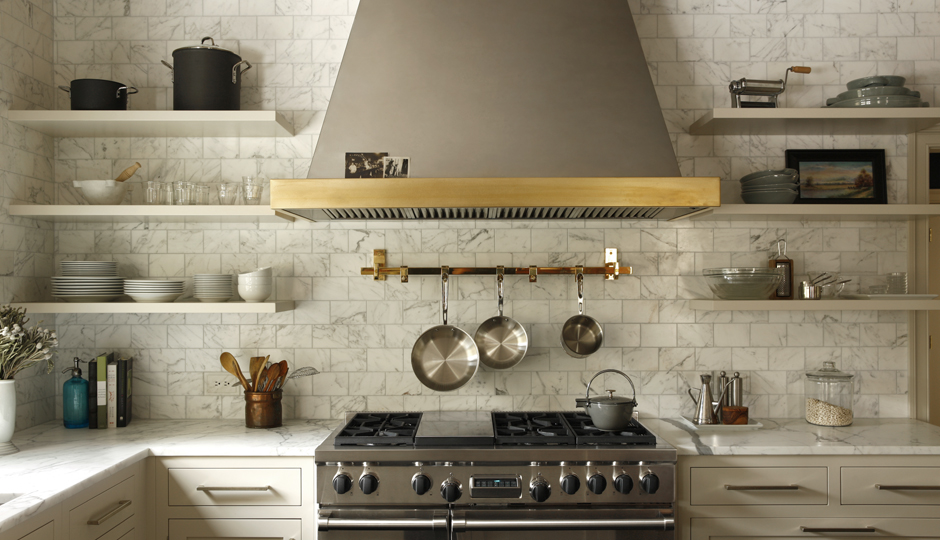
Open shelves in a Villanova kitchen designed by Ashli Mizell | Photograph by Jason Varney
Let’s be real: Open shelves — trendy though they may be — are fickle friends. On the one hand, they’re awesome looking in their easy, casual simplicity. But on the other hand, man, do they require a lot of thought. And cleaning. Oh, the cleaning.
“If you’re smart about what you put on your shelves — and where you place certain items — they really don’t have to be a constant maintenance issue,” says Rittenhouse-based interior design guru Ashli Mizell. “Open shelves are an opportunity to create a center of interest, show and enjoy things you love, and add tremendous character to a room.”
So, where to begin? Mizell has a seven-step formula that will transform your shelves from ho-hum to wowza in no time. Don’t believe me? Check out photos of her own gorgeous work below.
How to Style Open Shelves Like an Interior Designer
Step 1: Be authentic.
If you find yourself considering running out to the nearest Anthropologie and buying a bunch of stuff that you *think* will make your shelves look super cool, I beg of you: Stop right there. “There’s nothing I detest more than accessories that feel forced or look like they don’t belong to the homeowner,” Mizell says. “If you’re not an equestrian, don’t have horse statues and prints all over your house.” What you display on your shelves should be a reflection of you: of your interests, your hobbies, your travels.
I happen to be a pretty avid flea-market/thrift store/consignment shopper, so the open shelves in my living room are an eclectic hodge-podge of things I’ve unearthed over time: glassware in different shapes and sizes, figurines, sculptures, books, pottery, taxidermy. It fits because, well, it’s me, and all the stuff I’ve put on there shows it. Plus, everything comes with a story.
“Start with the things that are the most meaningful to you and then build around them in an authentic way,” says Mizell.
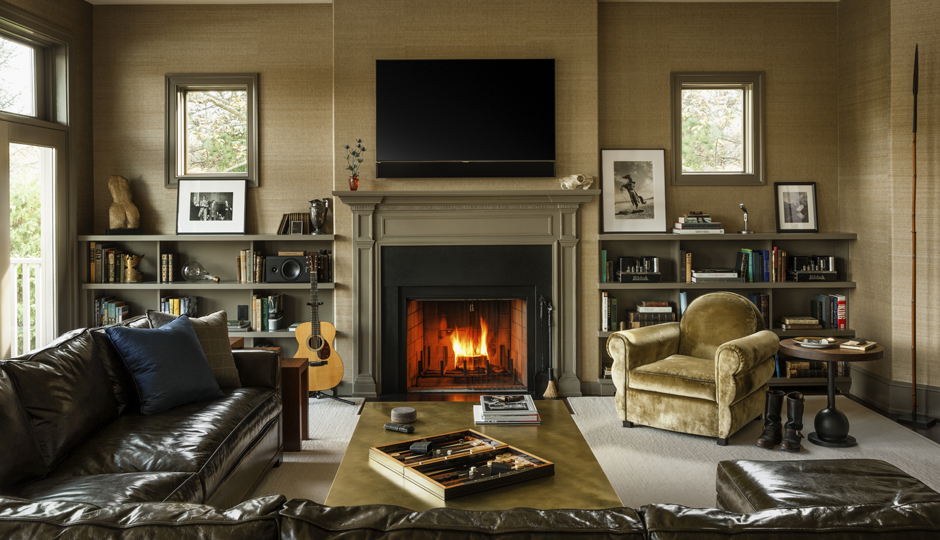
A living room in Gladwyn designed by Ashli Mizell | Photograph by Jason Varney
Step 2: Consider how — and how often — the items on your open shelves will be used.
Let’s think practically for a moment: Are your shelves in your kitchen or your living room? Your bathroom or your bedroom? Where they are located in your house will often dictate how often the items on your shelves will be used — and, therefore, cleaned. Shelves in your kitchen and bathroom are most likely to contain practical items that see daily or weekly use: plates and cups, towels and toiletries. In these situations, maintenance will be a breeze because the items will naturally rotate and get regularly refreshed. If your shelves are in your living room or bedroom, chances are they are going to be used mainly for display purposes. In that case … pay close attention to Step 3.
Step 3: Place larger things higher up, and smaller things at eye level.
Aesthetically, says Mizell, start arranging from the top, with larger items finding homes on higher shelves and smaller items at eye level. “You want simpler, larger ideas at the top of shelving, where they are easier for your eyes to take in and enjoy, and then work your way down,” she explains. “If it’s something that feels intimate and wants to be seen in an intimate way, you want it lower.”
But there’s also a practical reason for going big up top and smaller down low, says Mizell: “You don’t want 15 tiny glass baubles on the top shelf that you need to reach and clean and re-place individually. That’s a time-consuming maintenance nightmare.”

Open cabinets in a Villanova kitchen designed by Ashli Mizell | Photograph by Jason Varney
Step 4. Remember: Negative space is important.
Remember your good pal Negative Space from seventh grade art class? The blank space in a picture or piece of art work? Use it to your advantage with your open shelves: “Don’t be afraid to put a large item or object by itself and let it stand alone. Not everything has to be grouped and full,” Mizell says. “It’s better to allow a little bit of breathing room to things that feel special.”
Step 5: Mix it up: old, new, color, style.

Open shelves in a Gladwyn home’s bar area designed by Ashli Mizell | Photograph by Jason Varney
When creating vignettes on your shelves, go for a mix-and-match approach, rather than, well, a match-and-match one. Example: You don’t necessarily want all your red things grouped together, or all your photographs in one spot, or all your glassware in a cluster. Create groupings that layer in a few varying, yet complementary, items. Play with textures. Play with contrasting colors. Play with size and scale.
Step 6: Don’t buy trendy accessories for the sake of trendy accessories.
Remember back in Step 1 when we advised you to be authentic? Let’s say you’ve done that — you’ve gathered your collection of cool vintage dishware or art books or records — but you still have space you need to fill in. Don’t worry; it happens to the best of us. Now’s the time when you can run out to the nearest Anthro or HomeGoods and stock up on a few filler items, but I caution you: Don’t overdo it on super trendy accessories, like shiny metallics or those rustic vintage street signs everyone’s putting all over their homes lately (I’m sorry, but groan) as if plucked from an episode of American Pickers. They’ll be out of style before you know it, and then you’ll be starting all over. Go for timeless, simple pieces that can fill the space but blend nicely with what you have.
Step 7. Know when you need to edit.
Okay, so you started from the top-down; mixed and matched your most authentic pieces; created balanced, beautiful vignettes; and filled in the holes with a few smart baubles. Now. Step back. Take it all in. Notice where your eye is drawn to. What sticks out most. Wait … nothing sticks out, you say? It all feels rather crazy and chaotic? Oops.
“If you are unable to see the individual objects because there’s too much information happening, then you need to edit,” says Mizell. Remember: negative space, negative space, negative space.
You’ve got this.